
Picture this: you just got finished washing your car. You glide your hand over the paint expecting to feel a glossy, smooth finish, but you're instead greeted with a rough, gritty texture to your paint... What gives?
The culprit to your smooth paint woes is more than likely what we refer to as embedded or bonded paint contaminants. In other words, they're small, microscopic particles that work their way into the painted surface of your vehicle and bond themselves to a point where a typical hose & bucket wash will struggle to remove them.
Enter claying...
In auto or car detailing, there is a procedure referred to as “claying." Traditionally, the claying process utilizes a clay bar that's comprised of a soft resin compound most commonly made from synthetic materials. It has a similar pliability to modeling clay, and its natural gummy/sticky texture makes it perfect for grabbing on to and removing stuck-on, or embedded paint contaminants.
More recent developments in detailing technology have paved the way for more durable synthetic materials that mimic the natural “grabbing” action of the previous clay bars, but have a longer shelf life and aren’t as susceptible to being over-concentrated with dirt particles during use. Product developers have now applied this new material to things like microfiber mitts, towels and even foam pads to create a very convenient way to remove embedded paint contaminants. The most popular of these being the clay mitt variation.

"Which do you prefer to use, a clay mitt or a clay bar?"
Believe it or not, it's a pretty common question that we get asked frequently. Both versions of clay have distinct advantages and serve unique purposes. In this write-up, we’ll cover their advantages and walk you through some basic tips on how we use clay to maintain Jay's collection.
First off, why do I need to clay my car?
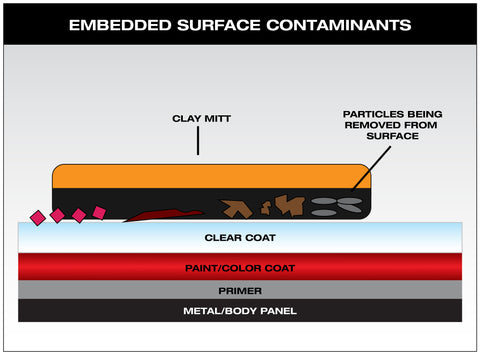
Claying is a hot topic as of late, and most people want to know “why”. Why do I need to clay my car? As we've already discussed, air-born particles from brake dust, environmental pollution, industrial fall-out and even over-spray make their way on to your car or truck's paint and embed themselves. They're usually too small to see with the naked eye, and they adhere themselves to your paint and become difficult to remove with just soap & water. Below is an illustration depicting an example of these contaminants.

This is where claying comes in handy. Due to the sticky nature of the clay material, it’s able to grab these embedded particles and lift them away from the surface. This leaves behind an incredibly clean, and very smooth surface that is ready for wax/sealant application or even polishing (if there are surface scratches/defects that need to be corrected).


The plastic bag test
Uncertain on how to determine if you car's paint needs to be clayed? You can use a plastic sandwich bag over your hand to help amplify the texture of the painted surface and make it easier to figure if you need to clay your paint or not. If it feels "bumpy" then you've got embedded contaminants, and claying will help you remove them.


Synthetic vs. Natural?
There are multiple grades of “natural” clay available, and the same goes with synthetic clay materials. They both have distinct advantages, below we’ll try and help you choose what is right for you.
“Natural” clay advantages:
- Usually much stickier than synthetic clay.
- Does a very good job of grabbing on to and lifting away tough embedded particles.
Disadvantages:
- You must knead the clay to bury any lifted particles into the interior of the clay, away from the painted surface.
- If the clay becomes too saturated with dirt/particles, or you accidentally drop it on the ground, you should throw it away and start with a fresh bar.
- Requires a clay-specific lubricant to be used in conjunction.

Synthetic clay advantages
- Easy and quick to use
- Simply rinse away lifted contaminants/dirt/particles
- Isn’t ruined if it is accidentally dropped on the ground. Rinse with clean water and inspect carefully to ensure no particles are stuck.
- Can use a clay-specific lubricant, detailing sprays, or even soapy water as lubrication.
Disadvantages
- Less sticky than natural clay.
- May require slightly more working time depending on how contaminated the surface is.
How to use a clay mitt:
The process is basically the same whether you’re using natural or synthetic clay.
- Ensure the surface has been thoroughly washed, rinsed & dried.
- All clay must utilize a lubricant to help it glide across the painted surface and reduce the risk of imparting scratches. With natural detailing clays, we would recommend using a clay lubricant specifically designed for the task. With synthetic clay variations, you can use a clay lubricant, detail spray, or soapy water.
- Working small areas at a time - saturate the painted surface with your choice of lubrication. We suggest spraying the clay or clay mitt as well to ensure proper lubrication.
- Lightly glide the clay mitt along the surface in a cross-hatch pattern (top to bottom, then side to side). You’ll notice that there is some resistance/drag at first, but as you continue to glide the mitt and remove contaminants it will become smoother and smoother.

- Continuously check the clay’s surface for particles. Rinse as needed, and add more lubrication to the surface.
- Once you no longer feel any resistance/drag in that area, take a clean microfiber towel and wipe the paint clean. Feel the surface with your finger tips and compare to an area you haven’t clayed yet, you should notice a distinct difference in how slick the surface is.
- Repeat on all panels of the car until you have finished.

It's important to note that depending on how contaminated the surface was, polishing may be required after claying to help correct any micro-marring that may have occurred. If no micro-marring is present, then we suggest to add protection (wax and/or sealant) immediately after claying.
If you're curious about where claying fits in to an overall detail, below is how we typically approach a car or truck that needs to be clayed:
- Thoroughly wash & dry the vehicle
- Assess the painted surface to determine if claying is needed
- Clay the painted surface to remove bonded contaminants
- If needed, polish the painted surface to remove any scratches/marring
- Apply protection in the form of wax, sealant or ceramic coating
We hope that helps answer some of the questions and concerns around how and when to use clay and/or synthetic clay alternatives. If you have any questions, feel free to leave them in the comments below.
13 comments